& Copper Country Historical Page
Copyright © 1996-2006
|
; |
How to mass-produce a speciality fleet Copper Range Railroad Wood Rock Car
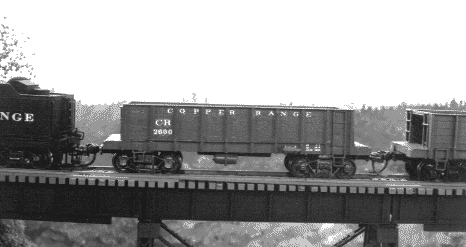
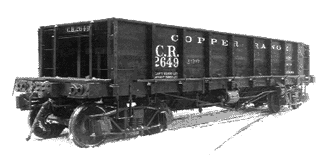
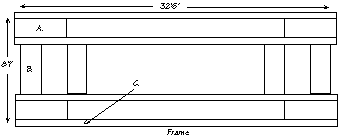
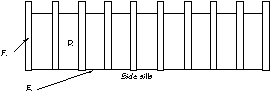
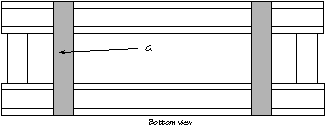
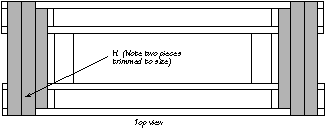
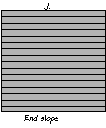
When I decided to model the Copper Range Railroad I knew I was in for a challenge. It is not an often-modeled railroad and thus requires a lot of scratchbuilding. Earlier this year I came to the conclusion that in order to give this railroad the respect it deserves I had to model it in its prime - the early 1920's. During this period the railroad had purchased all it was going to purchase, at least in the truss-rod era. Scratchbuilding structures is what I like to do but the idea of building an entire fleet of hopper cars did not strike me as a lot of fun. And since 50 would be required for proper operation the "fun scale" was dipping well below zero. After many long hours studying the photos and builders specifications I developed a design which is faithful to the original plan but is easy to build and duplicate. History Between the turn of the century and World War II the Copper Range Railroad maintained in excess of 300 wooden rock cars to service the copper mines of the Copper Range Consolidated Company. These rock cars are quite unusual as is the material they transport. Native copper - copper which is absent of sulfides - is found in conglomerates of basaltic rock, which is very dense, hence the cars had a low center of gravity and short length. As well as I can determine, the American Car & Foundry Co. built all of the Copper Range 40-ton hopper cars. Various designs and modifications were made over the years. This type was purchased as a lot of 50 on the 26th of June in 1917 - lot number 8427. The cars arrived on the Range in late January of 1918 and were numbered 2600 through 2649. Prototype Plans The plans for this model were derived from a report to the Interstate Commerce Commission Bureau of Valuation, form # 588 - Subschedule E, dated 1/31/30. I'm not sure I want to know whose tax dollars go to filling out and controlling this form, but I'm glad someone paid for this, as data on the Copper Range is hard to find. Since my Copper Range was going to require 50 cars in order to meet the three rock train schedule I am planning, these 50 cars seemed a perfect match. With the completion of my railroad from McKeever to Houghton, I am very anxious to start operating and seeing those long strings of rock cars rumble across the steel trestle over the Firesteel River towards Lake Mine. Construction This procedure requires only 5 different cut lengths and if you have a simple jig then building this car is easy. I would build these in sets of 5 cars to further reduce the building time. Assembly Start by assembling the parts labeled A and C. Once these have dried, glue the two halves together using part B. Be sure to offset the end pieces a couple of scale inches in order to show the support structure. See the prototype photo for placement. Next add the bolsters cut as part G. Be sure to taper the ends before gluing to the frame. I used a Model Die Casting high side ore car kit for most of the ladders and brake detail. I also used the weight from this kit. I milled out the center of the weight in order to represent the drop bottom design of this car. This weight is added to the opposite side from the bolster and should fit inside of the side sills of the frame (glue with GOO). You could omit the weight, but the weight area would have to be covered in wood or styrene as this is the bottom of the car. This completes the frame assembly except for the top plates, part H, but these will be added after the sides are in place. To assemble the sides use part D and scribe a line every 10" to represent the 5 individual boards which make up the side. Once this has been completed on both sides add the 10 sill pockets, part F to one side. These sill pockets should be placed just over 3' apart and should extend 1' below the side as this part will attach to the frame. I made a measuring jig for this with marks at the appropriate intervals. After this assembly has fully dried then add part E to the top of the side, this should lay flat against the top of the side and the tops of the sill pockets. Repeat for the other side. The completed side with ladders can be seen in the photo. I found it easy at this point to drill the holes for the trucks and the coupler pocket. I used Kadee archbar trucks and Kadee #5 couplers with the Kadee pocket which is mounted to extend beyond the end of the car to simulate the prototype. Do not mount the trucks and couplers yet. Attach the sides to the frame, one side at a time and make sure it is square. I perform this function by laying the frame on a piece of plate glass and applying a machinist square to the side while it dries. Once the sides have dried trim the sill pockets flush with the bottom of the frame. You are now ready to attach the top plates. These are labeled part H. Two of these should lay on the frame, butt up against the end of the sides and extend to the end of the car. You also need to place another, so there will be three on each side. The final one needs to be trimmed to fit between the side sills, directly under the sloping ends. Now you are ready to place the sloping ends. These are parts J and have been cut about one scale foot too long in order to line up this slope with both sides. Mark the end of the sides on the slope and trim to size. Two pieces of 2"x6" should be installed on top of the slope to complete the top of the box, in other words they should butt up against parts E. At this point I added the brake detail and the additional ladders on the ends of the car. I chose not to model the brake and drop bottom air lines in detail, choosing instead to place only the major components. Some day I may go back and finish off the detail, but now I want to operate. I also added the hopper drop doors by building a triangle of wood or styrene. Painting is next, although I'm not sure of the actual color - some Copper Range cars were red and others were black. These cars were painted Floquil box car red and sealed with a gloss coating in preparation for the decals. The coupler will line up with a gauge without any adjustment but I added a Kadee washer in between the truck and the bolster in order to provide a solid surface for the truck to ride. Attach the couplers. The car should be lettered using Microscale Railroad Roman Letters. One final coating of Dullcote, some weathering and the model is complete.
|
|
||
|
||
| . | ||