& Copper Country Historical Page
Copyright © 1996-2006
|
; |
Building the Oregon Depot on the CB&Q
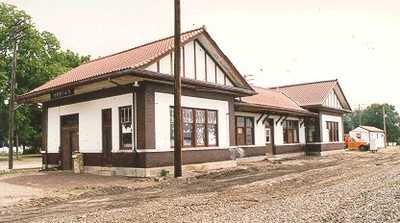
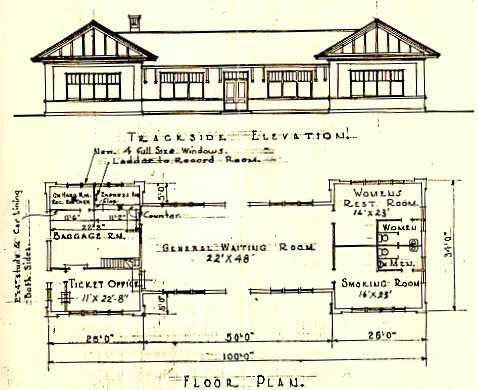
Originating near Watertown Wisconsin, the Rock River, called the “Sinnissippi” by the native Illinois tribes, flows south into Illinois until it joins the Mississippi River at Rock Island Illinois. Eighty miles upstream its rocky waters cut limestone cliffs from the surrounding hills, creating the Rock River Valley. It was in this same region, around 1730, that the Sauk and the Fox tribes were forced to live after being driven westward by American expansion. Driven even further westward into Iowa, in the early 1800s, Blackhawk, the chief of the Sauk tribe, raided into Illinois to try and regain their ancestral lands. In what would be known as the Blackhawk War a young Abraham Lincoln got his first, and only, trial as a soldier. Blackhawk’s fate was to be captured in 1832 and ordered on a reservation. Lincoln, on the other hand, went on to became a lawyer, and, well, you know the rest. In his early years Lincoln stayed on occasion in a growing village called Oregon on the West bank of the Rock River in the heart of the Rock River Valley. Formed from a part of Jo Daviess County in 1836, Oregon was chosen as the government seat for the newly created Ogle County. A focal point of Oregon is the courthouse, built in 1891 of brick and stone in classic Victorian style. Imitating these materials, but not the style, the Chicago, Burlington and Quincy Railroad built a new passenger station at Oregon in 1914. Located on the Aurora Division of the CB&Q the Oregon depot replaced an older one, part of which would still be used for freight storage. Looking more like an alpine chalet, the station represented a modern design with all the modern features of a building built at the start of World War I. The exterior was completed with pressed brick, stucco panels, both accented by stone trimmings and a large overhanging tile roof.
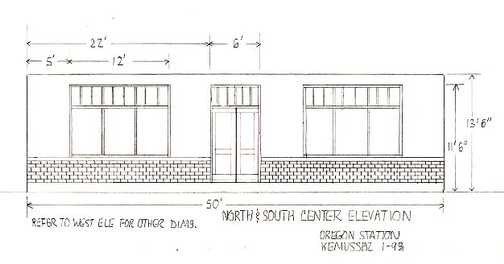
Built at a cost of $18,000 by T.S. Leake & Co.of Chicago, the interior boasted a 50x22 foot general waiting room in the center of the station. A separate men’s smoking room / rest room and woman’s waiting area / rest room comprise one wing. The baggage room and ticket office constitutes the other wing. Both are 34x25 feet in size. The interior was finished with an enamel brick wainscot to a height of five feet and plastered for the remainder. The ceiling was plastered and panelled with beams. The floors were tiled throughout. Passengers would enter through the doors at the center of the station from Collins Street and exit on the other side onto an expansive brick platform and walkway to awaiting trains. The station was modified in 1930 to make the baggage room windows match the other full size windows. This was prompted by changes in the interior to further subdivide the baggage room, or maybe, just to have the windows match. The early windows in the baggage room were less than half the height and were located along the upper window line. The Oregon depot still stands today, somewhat the worse for wear, and is being used for storage on the BNSF railroad. The depot was listed on the National Register of Historic Places in 1997.
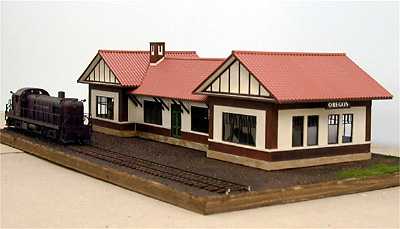
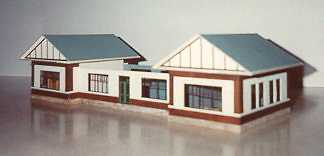
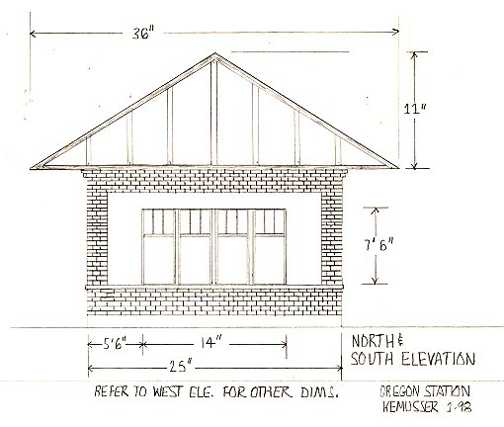
The ModelThe predominance of stucco on this structure suggests the use of illustration board, which somewhat simulates the texture of stucco at this scale. I have found that truly simulating texture at 1:87 scale is a matter of coloring to achieve depth, and not true depth. I used Crescent illustration board (Cold Press Surface, No. 300, Medium Weight), which, at a thickness of .100 inches gives very good stability for modeling. The overall method of construction was to build the wings as complete structures, attach them to the center section walls, then finally build the center section roof, something that turned out to be the most interesting. I like to keep things simple, so here’s a short materials list, needed to build this structure: • Illustration Board • Embossed brick paper • Scale Lumber: 1”x6”, 2”x6”, 2”x2”, 3”x3”, 22”x4” • Plastruct PS-135, Ridged Clay Tile sheet stock • Clear plastic (thin, window material) • Scrap basswood sheet stock for door material • Some nice sized basswood squares for edge wall braces • Microscale Micro Kristal Klear • Floquil Roof Brown, Rail Brown, Antique White, Refer White, Poly S Earth Red and Depot Olive The walls and the window openings were cut first. To achieve a stucco texture I painted the walls Floquil Antique White and allowed it to dry. Floquil Refer White was then dry brushed over the walls to achieve depth. All of the windows and doors were then installed. I built them all from scratch as nothing on the market even comes close. I used strip basswood 3x3 scale inches for the frame and 2x2’s for the mullions, which were painted full strength Floquil Roof Brown. The doors were painted Roof Brown and Poly S Depot Olive. The marble trim piece was added next. It was made from strip basswood 2x6’s. Painted in the same way as the stucco walls, but with more accents with the Refer White this time.
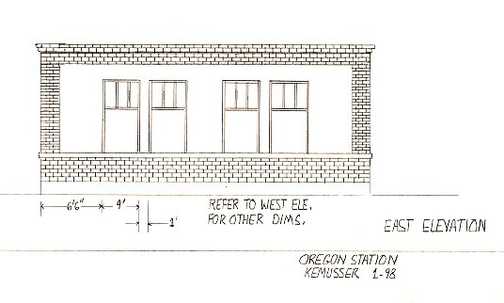
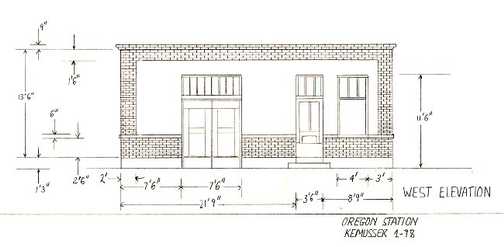
The bricks were cut from embossed brick paper, painted Polly S Earth Red, left to dry and then dry brushed with Roof Brown. Remember to paint the inside edges of the brick paper and allow for overlap so when they come together at the wall edges you can then trim off the excess and touch it up with Roof Brown, making a nice clean edge. The bricks were then glued in place, above and below the “marble” trim piece. The grade varies around the foundation line so I chose to model it at the maximum exposure. It will be custom placed in the layout at a later time and then adjusted. You can just size it to your liking. I chose to use a 22x4 basswood strip to simulate the stone foundation. Again I used color to simulate depth, and in this case, to make the wood look like stone. I made indentations into the wood at intervals to simulate the edges of the stone. I then painted it Floquil Foundation and let it dry, then dabbed on full strength Floquil Rail Brown and wiped it off with a rag. Let that dry and then dry brushed on highlights with Antique White. It produces a nice faux finish. Once the wing walls are at this stage you can glue them together to make the two separate wings. Trim off all the overlap material from the trim pieces and touch it up with the appropriate color. Clear plastic was then added for the window glass. The center two windows on the Eastern Elevation were glazed, as they are the two bathrooms. They were glazed by sanding a piece of clear plastic in an up and down motion. The roof was constructed from the same illustration board. The roof wall sections were painted like the stucco walls and the beams and trim are painted Roof Brown and were made from scale 1x6’s. The complete roof is assembled, insuring that the roof wall sections are in line with the lower walls, inset from the edge of the roof. Plastruct PS-135, Ridged Clay Tile sheet stock was used to tile the roof as it was the only material I could find that could span the center section in one piece. The tile was glued to the illustration board with Goop, the best stuff I know to glue anything to anything. Tile caps were added at the peaks and the open ends filled with Microscale Micro Kristal Klear, left to dry and then painted to match the roof color. The entire roof is trimmed out with scale 2x6’s, painted Roof Brown. At this point both of the wings are completely finished. The center section walls are now attached to the two wings, and an overhanging ceiling is then glued in place. At this point you have an interesting bit of measuring to do to insure that the center roof fits in place while cutting into the two wings. I have attached a rough idea of what the cut should look like (see Figure 1) but you need to measure all of these points on your model and make your own best judgment. I also added a tile cap on the peak. I constructed the chimney using illustration board and brick paper. Micro Kristal Klear was used as a roof tar to seal the center section roof to the wings, left to dry and painted over with a color that matched the roof. I didn’t like the idea of using black tar, I think that was done later when they didn’t care about what the roof looked like any more. I greatly enjoyed building this structure mainly due to the number of different materials I was trying to model and modeling them in new ways I had not tried before. I have to take time to thank Charles Pomazal for his generous help in providing me with additional photos and dimensions, as well as some interesting historical documents. I could not have completed this without his help. I can’t wait to see some finely detailed green BN diesels roaming past this depot. Get to work, Mark. Thanks as well to Mark Castelli for his many words and photos, here in the Hotbox, on this area of the country, that inspired this model.
|
|
|
||
|
||
|
||
| . | ||