& Copper Country Historical Page
Copyright © 1996-2006
|
; |
Champion
Mining Co. Mining Captain's Office Structures
of the Keweenaw
This spring I once again made the trek up north to the Keweenaw. As I was driving I wondered why I model something that is 500-plus miles away. After all, if I modeled the Michigan Central I could just walk out my back door and model what I see. I could spend every weekend at local libraries and historical societies until they got sick of seeing me. The answer, of course, is contained in the old adage, "absence makes the heart grow fonder." And on deeper reflection I realized that it is the effort and focus the trip provides that drives me to model a prototype so far away. Preparing and actually traveling to my prototype allows me a couple weeks a year to think about nothing else except what I am researching and modeling. A real added value of modeling a prototype is discovering the history of the structure and experiencing the joy and memories of discovering this history. The following story is a combination of the history of my experience with this structure and of the structure itself. Operating and building a model railroad is only one part of a larger picture that unfolds when you take the time to learn about your prototype and experience this with others who share your interests. All of this creates fun and focus which will increase the enjoyment of your railroad immensely.
My old friend in Painesdale In the fall of 1978, while driving my blue '72 VW bug, I first came across Champion No. Four shaft/rockhouse peeking out over the multicolored foliage on the road from Chassell to Painesdale. As I drove up to the site I spotted three rusted orange box cars sitting along side No. Four and some outbuildings. A row of company houses straddled the scene nearby. I turned up Led Zeppelin on my radio and drove on by. Well what can you expect - I was 18. In the mid 80s, when I started to focus my research on the Copper Range Consolidated the main reason was the good condition of the facilities in Painesdale, specifically around Champion No. Four. Painesdale, unlike other areas, has changed very little since the mine shut down for good in 1967. Painesdale still retains its company town image largely due to water, which I will explain later, and no recent development. Like Painesdale, the structure featured in this article has changed little over the years, and its gable-front design mirrors the company homes and shaft-rockhouse that surround it. I kindly refer to it as "my old friend in Painesdale", happy to see it still standing each time I visit. Now, in the mid 90s, as I began to model the town of Painesdale, I have started to spend a lot of time documenting the remaining structures and talking to retired miners and townspeople to help me get a better understanding of the site. With the recent acquisition of Champion No. Four by Painesdale Mine & Shaft, Inc. I now have an additional resource to draw from. This year I was able to climb to the peak of the oldest shaft-rockhouse in Michigan, which gave me an all together different view of Painesdale than I have ever had in the past. It was like viewing the prototype from the same perspective as my model railroad. Making my last couple of trips with a good friend and fellow railroader has only helped to increase the fun I have had in my association with modeling Painesdale. My connection with Painesdale continues to this day with my Copper Range Internet web site. I have been working with PM&S to give them a presence on the web and in the process I have been in contact with people from all over the U.S. who have had connections with the mine. Their stories continue to add to my modeling experience in ways that just building a railroad could never do. So in case you have a story to tell, or you would like to find out more, you can visit the PM&S site. They are a non-profit group working to restore Champion No. Four and the surrounding support structures. While you are at it send them a contribution and maybe pickup a PM&S sweatshirt.
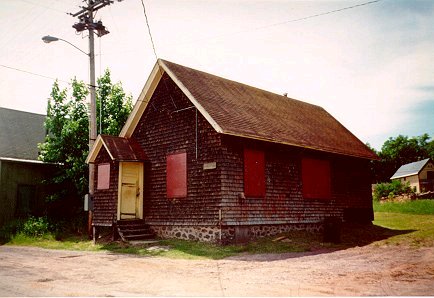
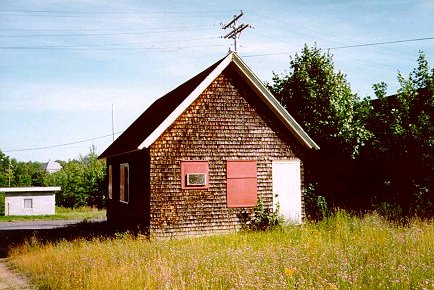
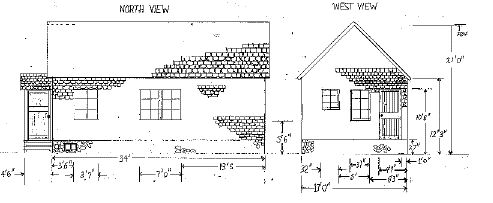
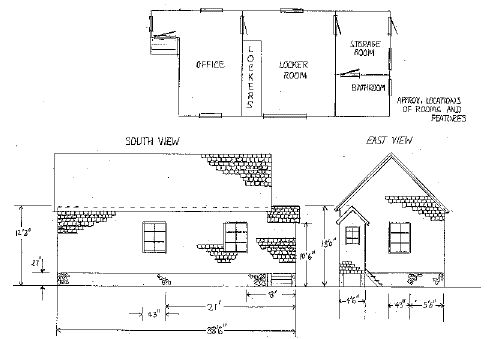
The life story of my old friend Painesdale, by American standards, is a relatively young town. Traveling with Dr. Lucius Hubbard in the spring of 1899 you would have traveled by stagecoach or wagon down the military road from Houghton and crossed paths with three contractors clearing timber for the soon-to-be constructed Copper Range Railroad. Just south of Atlantic Mine our party would part company with the contractors and the road in order to cut through the dense woods toward the southeast. At the present-day intersection of Goodell and Chassell roads Dr. Hubbard and his party would discover an outcropping of copper and the Champion Copper Company and the town of Painesdale would spring to life. Work clearing the land began in earnest. By the fall of 1899 two shafts had been erected. By 1902 a total of four shafts and a small community had developed out of the dense hardwood undergrowth. Champion Shaft-Rockhouse No. Four was built in 1902 along with the Mining Captain's office at the southern end of the shaft system. The mining captain's office was the place to go if you were looking for a job with the mine. The office sits in the shadow of No. Four not more than 50 feet away and commands a good view of the surrounding support structures. Looking out of the window, the mining captain would have seen a small open air lumber mill behind the shaft house which provided lumber for the town and the mine. A tool house and garage were added at a later date and still stand next to the office. Mining captains in the 1950s and '60s, as the mining activity wound down, enjoyed viewing John Katalin's summer garden growing between the hoist house and the shaft house. John was a long time operator of No. Four's hoist and was very important to the mining captain and crew. An underground spring tapped by miners in the early days of the No. Four shaft development set the future in place for No. Four after the mine finally closed in 1967. After this time the hoist, shaft and captain's office were used by the township to continue to pump fresh water to surrounding communities as well as Painesdale. The water from this spring is one of the freshest sources of water in the United States. The shaft remained open so that township operators could service the pumps in the mine. The captain's office served as an office as well as a changing room. By 1995 the township had built a new pumping station just south of the shaft, directly over the spring. The shaft house was no longer required and all power was removed from the site and the shaft was capped. At this same time Painesdale Mine & Shaft was formed to take over the responsibility to restore and maintain the site. The Captain's office was turned over to PM&S at this time. The mining captain's office is currently being restored and will serve as a presentation area for those visiting the shaft house. Contained within will be articles related to the mining industry as well as a many scrapbooks filled with photos and recollections of those who lived and died below and above the ground.
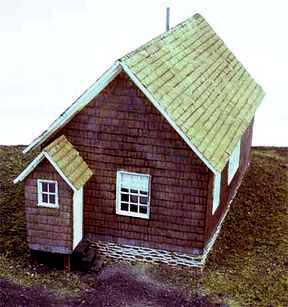
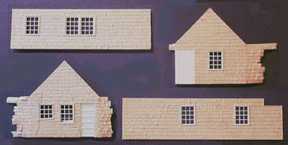
Building the model Thecaptain's office is a gable-front design which was very popular at the turn of the century. This variety was better known as a shotgun house, so-called because you could open the front door, fire a shotgun through the house and out the back door without hitting anything. Generally more popular in the south, it was also common in the northeast. The Boston influence of Champion owner William Paine transplanted this style to Michigan in all the buildings of Painesdale. Although it is impossible to tell from my prototype photos, The windows are six pane. I chose a 12-pane, as a Grandt Line #5009 is more or less the same size as the prototype and I hate making windows. The #5009 does not include any window trim, which makes it perfect for cedar shake siding as this building has no window trim. I started by cutting the window openings two scale inches larger than the windows so I could place 1" basswood strips around the window frame to build out the frame. Two 5009's were used on the double window with 2" basswood vertical frames and 1" x 6" horizontal frames. The windows and roof trim were painted Antique White. The rear bathroom window was also made from a cut down 5009 window. The two doors were built up on the wall from stripwood as I could not find a suitable one available that was dimensionally correct - and I like making doors. They were also painted Antique White. Although the prototype has white trim I never use straight white on my buildings as nothing exposed to the elements stays white for more than a week. Even then viewing through the haze in the air will dull the white to give it an off-white tone. In general, always tone your colors down by adding white (the only thing I use white for). You can add a little yellow to your white to make it antique or buy antique white. The next step was to add Campbell shingles to the four walls. I built two of these models, one for me and one for PM&S, and I can say that I will void buildings with shingles for awhile - way too many shingles. As can be seen in the photo I left the shingles long on the peaked walls. This building has no trim so the sides of the building must meet cleanly. The shingles will be trimmed after the walls are glued together. I used basswood sheet stock for the walls. The shingles were moistened to work the glue on the back of the shingles but I also ran a bead of yellow glue to make sure they don't come back up. You will also notice that I extended the one wall to include the mud room. In this way I had a good right angle in which to build the remaining two walls of the front mud room. I also marked on the front peak wall where the mud room walls would extend so I didn 't place shingles in that area. The two mud room walls include a scratchbuilt door and one Grandt line #5059 outfit car window. The four walls and the mud room were glued together using large basswood supports on the inside as the interior of this model was not detailed. I have included the present room arrangement in the drawing if you care to model it. The real secret in making this look like the Captain's office and not a mummy wrapped in Campbell 's shingles is painting the shingles. If I just want color I use Floquil or Polly Scale, but if I want depth I use watercolors. Cedar shingles range in color from yellow oak, in areas where the weather doesn 't get to it, like under the eaves; to black, where the weather beats on it, to gray where the weather has baked and soaked the color out of the wood. Various shades of red also appear. I use Grumbacher watercolors which come in a tube. They are expensive but a little goes a long, long way. Place a small dab on a palette and mix in a lot of water to create a wash. The formula I used for this structure was to first completely coat the walls with a wash of Raw Umber. I let this dry and repeated the process. I also highlighted the windows and roof trim with this color as it helps to bring out the shapes and to further dull the white. Once this has dried I mixed Burnt Umber with a small amount of Ivory Black and created a medium wash a little thicker than the first wash. This was used to cover the walls everywhere except for under the eaves. I let this dry and applied the same wash to random areas and under the windows to build up the color in some areas. This was then left to dry overnight. The next day I put down some Charcoal Gray, Chinese White and Raw Sienna on my palette. The Charcoal Gray is more like a dull black. Mix some of this with the Chinese White to get a good gray color and wash and dry brush this to the last one or two courses of shingles at the bottom of the structure and further up in random places. The Raw Sienna was made into a wash and was used to highlight the red that appears here and there in the aged wood. Once this was dry I used the Charcoal Gray, Chinese White and Raw Sienna straight and dry brushed further highlights on the shingles. It may sound like a lot of work but it isn 't and the effect is realistic in simulating aged Cedar shingles. After the walls were completely painted I then put on the roof shingles. I normally place roof shingles after the roof is on the structure as all that glue on the shingles causes the roof to curl, making it harder to place. I also didn't want any of the darker washes to get on the roof as I wanted to simulate a near new roof for contrast. The roof was painted with a wash of Raw Umber left to dry and then repeated, just like the first step in painting the walls. I added a small piece of brass tube to represent the roof vent and painted it silver. I added the stone foundation at the end. I use to make my own from plaster, but that was until I found #7011 Random Stone from Heki-dur. This is a foam product and when painted looks great. I painted these with the same water colors I used for the walls mixed with a little water. The raw color of the foam allows you to just highlight the stones. The foundation rises 27" above the ground line in the front, so a staircase is needed. In the back the grade rises to meet the top of the foundation. You can do what you want to meet your scenery requirements. If you have an interest in the Champion Copper Company facilities in Painesdale then please look for future articles in this series as I will be covering all of them. If you are interesting in saving the real thing then please send your contribution to PM&S today.
|
|
|
||
|
||
|
||
| . | ||