& Copper Country Historical Page
Copyright © 1996-2006
|
; |
The Mineral Range Railroad depot at Houghton, Mi. Structures
of the Keweenaw
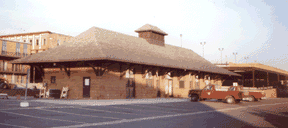
Living in Houghton in the late 70's I found myself spending a lot of time down on the yard tracks of the Soo Line and Copper Range Railroads. At this time only a single freight train ventured out of Houghton towards Nestoria and returned in the evening, the line north of Houghton was handled on Saturday. The Copper Range had been shut down for six years but some of the physical plant still remained. Evenings I spent watching the "Red and White" local return from Nestoria and switching cars into the Houghton Yard. I would always end up in front of the once proud Mineral Range (later DSS&A, then Soo in 1961) depot between Isle Royale and Huron streets.
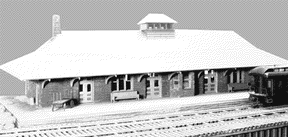
Father time had not been kind to this relic. The windows were boarded up and the roof barely existed. Around this station was Houghton's waterfront warehouse district, including such companies as Roach & Seeber, Swift & Company, Cohodas-Paoli Co., and F. Wieber & Sons (covered in later installments of Structures of the Keweenaw). In an earlier time, both passengers and freight were marshaled in this area. Despite the wear, the charm of what once was, was evident. I am glad for the photos and documentation I gathered on the area at that time since Houghton has changed drastically. The Copper Range yard has been replaced by yuppie condominiums and a marina and for a while the depot was reduced to being a fast food restaurant. The Soo is gone and its mainline replaced by jogging trails, the warehouse district has succumbed to Houghton's ever increasing need for parking structures. I guess this is all good for tourism but it makes me wish I had been born 100 years ago. The only survivor from this area is the Mineral Range depot itself. After years of decay, Yalmer Mattila, a local construction company, renovated the structure almost back to its original form. But seeing the depot today for the first time it might be hard to imagine that trains ever ran past it. History If I were writing this article in 1903 I would tell you that the third DSS&A station was being built so as not to be outdone by the relatively new Copper Range Railroad's stone station in Houghton, built in 1899. This new DSS&A station would replace an existing station which at one time was owned by R. Sleldon & Co. and was originally built as a storage house for fresh meat. The station was towed across the Portage canal to Ripley in 1903 and became a hotel. The first station was built in 1883 by the Marquette, Houghton and Ontonagon Railroad and was located in the DSS&A yard. In 1893, it became an agent office and was used as such until service ended in 1982. It was destroyed by fired in 1987. David Hood of Duluth was selected as contractor for this structure, which was to be built of Jacobsville sandstone, locally referred to as "brownstone." The Keweenaw region contains rock older than any other place on earth, and Jacobsville sandstone is one of these. Construction occurred between June 4 and Nov. 2, 1903. The construction method for this structure was unusual. Normally, single story stone structures will have a wood frame with stone added as a covering. This design used one-foot thick sandstone blocks as the frame with the interior walls attached to them. This is probably the reason the structure still stands - it simply can't fall down. The station contained five rooms-a ladies retiring room, general waiting room, ticket office, baggage room, and boiler room. Minor changes were made over the years, mainly increasing freight space at the expense of passenger waiting areas. Construction The plans and most of the history for this structure were obtained from the Soo Line Historical and Technical Society. Anyone modeling this area and not belonging to this group is ignoring a valuable resource -join today. The July 1992 issue of their magazine contains detailed original plans for this structure. The information provided here is general in nature and does not include all of the structural details.
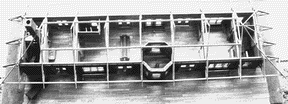
As I intended to build this model almost the same way as Mr. Hood did, I decided I needed a very sturdy base to start, as the sandstone walls would be simulated by Hydrocal plaster. My railroad base is 1/2" plywood and 1/2" Homosote, so I chose a piece of 1/2" plywood to fit into a section of cutout Homosote. This piece of plywood was the flattest I could find and was larger than the model by 20 scale feet on all sides. I started by gluing the floor plan to the piece of plywood with rubber cement. After the glue had dried I cut out the boiler- and coal- room sections, as these rooms were below ground level and extended below the depot floor. At this point the entire base was sealed with varnish to keep the base from warping later on. After the varnish had dried on the base, I started by gluing scale 2x's, the thickness of each wall, on to the floor plan. This would establish the exact locations of each constructed wall section. The boiler room and coal room were completed to the main floor level, by adding Hydrocal walls to form the basement, completed by the addition of the stairs and the dirt floor. I scratchbuilt a small horizontal boiler and placed it in the boiler room, filling the coal room with coal and a shovel.
The main depot floor was built board by board, each board prestained with a light coat of maple stain. The floors were built using 10"x2" boards which fit into the open areas created by the wall floor boards. One thing I have learned from scratchbuilding is that scribed siding stock does not look like wood flooring. Take the extra time to build the floor right. If you want a floor to look like a real floor you must build it the same way. The two restrooms floors were not wood but tile, and this was simulated by scribing tiles into sheet styrene and gluing them to the floor plan. I also added the planking for the station platform at this time. I chose to completely detail the interior, and like the prototype I chose to build the "sandstone" walls and attach the interior walls to them. The Hydrocal "sandstone" walls were formed on glass, as I described in a Hotbox article in the fall of 1994. The walls were made 1 scale foot thick and the exterior blocks were carved after the mold had set. This technique creates a perfectly flat interior surface on which to build the interior walls. The south wall, all 102 feet of it, was constructed as one piece. This wall was also the first to be placed on the base, as it provided a reference point for all the other walls.
I started the back of this wall section by placing 2x's at the proper wall location for each connecting wall. This will help to frame in the other interior walls later on in the assembly. All of the interior rooms featured birch wainscoting and finishing trim in natural birch. The upper wall was plaster. I used scribed siding for the wainscoting, first painting it with foundation and then a light coat of maple stain. In this way the grain is removed and the wall appears uniform as does most wainscoting. The walls are basswood sheet stock painted light green, as was the prototype. The windows are all custom and were built board by board. Each window has an interior side and an exterior side, with a piece of clear plastic between the layers. The interior side of the window was completed first, using the basswood interior walls as reference for squareness. Each cast window cutout had to be squared up before the exterior side of the window was completed. The external window frame helped to eliminate any mold errors. The exterior frame was painted light green and the interior window frames were stained maple. The most difficult window contained 18 individual pieces - there are three of these windows. The doors are built by forming 3 layers of thin Bristol board into one. The first and third layers contain the window openings and the wood inlay openings for the interior and exterior door. The second layer, sandwiched between the outer layers is the inlay backing and a clear plastic window section slightly larger than the window opening in the first and third layer. This technique is outlined in the book "Cottage Modeling for Pendon," by Chris Pilton. Unfortunately you must go to England to buy it, as it is unavailable on this side of the pond. After the interior wall and exterior windows were completed I attached the south wall to the base, holding it for what seemed like days, to make sure it was square. The coal room and boiler room are the only rooms which have sandstone interior walls. I scribed and painted these walls the same as the exterior walls . After the south wall had set I started by adding the boiler side wall and then the baggage/boiler room wall. This completed the boiler/coal rooms except for the small north wall section, which wasn't added until later. The wall between the coal room and the boiler room was framed in with 2x4's. Next came the baggage/general waiting room interior wall. This wall has a feature, that is difficult to understand without careful study. It was described as a large window, but in actuality is a raised platform with a large cantilevered door which moves up and down within the interior of this wall. The purpose of this door was to move baggage from the waiting room to the baggage room without having to go outside, perfect for northern Michigan winters. I chose to model this door as a functioning door (you have got to give those HO people something to do). I built the wall in 3 layers, which allowed the door to be sandwiched between the outer layers and thus able to move freely with some friction. The men's restroom was completed next, complete with stalls, toilet paper holders and wastepaper baskets. Proper attention to the order of construction was very important as once complete, each room was almost inaccessible. The women's waiting room and restroom and station side wall were added next. The only non-scratchbuilt item on this model are the columns and turned spindles that form the women's waiting room entrance wall. These were Grandt Line products. The word WOMEN is decaled on the top of the entrance door, as was the prototype. A newspaper article of the time stated that the women's room had a piano, so I added one of these to the waiting room, built from scratch from dimensions taken from a friend's piano. The north wall was added last as two parts, separated at the start of the office octagon. I temporally added a length of basswood between the two walls to make sure they were aligned before the glue set. After the glue dried I removed the brace and built the external portion of the octagon by making three separate plaster castings, all oversized in width, of each of the three exterior walls. The wall sides were sanded to the exact angle and glued together. As with each exterior wall-to-wall connection, after the glue had dried I mixed a slurry of plaster and "grouted" it into the joint. Be sure to wet down the wall first or the plaster will dry on contact with the wall. The grout is then sanded and new block lines are extended into and around the wall edge, creating a 3-D block structure at the corners. The interior office walls were the last to be added. The office interior window grating was made from some scrap brass fence material. Built-in storage cabinets were also added to this wall. Other details, include an office desk and phone and waiting room benches. The roof of this model was made removable to show off the interior detail. Most removable roofs suffer from structural defects when not attached to the structure and never sit properly on the model. This roof was constructed as a hat that fits over the roof trusses. The roof trusses, a type of modified warren truss, were assembled and attached to the structure. The prototype roof was of slate, requiring the strong truss support. To simulate slate I used 9" lapboard siding and scored each tile into the siding to create the slate effect, then painted it dark green. I don't know how many slate tiles I scribed on that siding, but I know what a woodpecker feels like. If I had to do it again, I would think of something else. The roof was constructed of eight pieces of scribed siding, each making up the contour of the roof. The roof was trimmed with copper PCB tape to simulate copper trim. The roof vent was constructed using individual boards for the vent slats to give a true see-through appearance. The overall roof structure forms the brim of a hat and therefore was self supporting and could be set on the roof trusses and removed without fear of damage. I am very proud of this model -it placed first in the 1993 NCR "Autumn Express" on-line structure model contest. My 100-plus hours of labor were worthwhile as it still reminds me of those evenings I spent railfanning instead of studying.
|
|
|
||
|
||
|
||
| . | ||