& Copper Country Historical Page
Copyright © 1996-2006
|
; |
Copper Range Freight House and Shelter Structures
of the Keweenaw
The key to a good model railroad is not the models alone. In order to get the most out of this hobby you must operate. Good operation is what makes or breaks a good railroad. If it doesn't operate then you won't be likely to complete and sustain it. One of the main reasons I selected the Copper Range is for the many intra-railroad moves. Moving Copper rock from the mines, to the mills, to the smelter, creates a completeness of process. The railroad is actively involved with the entire process from start to finish. Copper was not the only raw material to be processed in the Keweenaw, Wood was just as important, as it was the only thing that kept the Copper Range Railroad alive after WWII.
The Stratton Handle Factory was one such business which not only moved a lot of lumber but also moved it within the Copper Range limits. Stratton had two spurs, one at Wibbings Crossing, near Donken, and the main spur south of Winona called the "Stratton Spur". Lumber from these logging operations was moved via the Copper Range to the handle factory in Atlantic Mine for processing. The final product was shipped via box cars to their final destinations in the Midwest and Eastern United States. These types of intra-railroad moves are what keep operation fun and interesting. Proto-type structures don't hurt either so on with the history and construction. Stratton Handle Factory The name Stratton contains a great deal of history for the Atlantic Mine area. John Stratton began working in the South Pewabic mine in 1869 and eventually became mining captain of the Pewabic, which became the Atlantic Mine in 1872. He died in January of 1909 surviving the mine he gave his life to by three years. Three years after his departure another Stratton, although not related, came to the Atlantic Mine area. De Forrest A. Stratton, after logging all of the available timber on his Tower, Michigan property, decided to move his entire operation to Atlantic Mine. Mr. Stratton's factory produced wooden handles for many industrial and commercial uses. The new facility was constructed by January 1913. By March of that year the operation had began to produce 25-30,000 handles and cut 30,000 feet of lumber per day. The complex in Atlantic Mine included a 95x32 foot sawmill, 74x32 foot boiler/engine house and the 287x32 foot factory itself. Value added services included painting and varnishing, which would in turn lead to two majors fires at this site, one in 1923 and again in 1936. The factory was the only business south of the Portage to be operating during the Western Federation of Miners strike of 1913 and at many other times employed disabled miners. The factory employed over 100 people, at most times, and expanded their range of products over the years. The handle factory closed in 1942 which left only the sawmill in operation. In 1946 Mr. Stratton died and in turn the business was turned over to his wife. The business was sold one year later to a Mr. Copeland and it was called Copeland Lumber Company until 1949 when the site was dismantled After the closing of the handle factory and sawmill, Atlantic Mine was never the same again. Many stores closed along with the school. A small two story office building is all that survives today and is now a private residence which is located on the south side of Stratton Road. The factory was located on the North side of the road to the point of the old Atlantic & Lake Superior RR mainline, further north. The 'Stratton spur' In conjunction with the building of the Factory and Sawmill in Atlantic Mine the Company purchased two separate plots of land in 1913. As previously mentioned one was located near Donken and the other was just south of Winona. The "Stratton Spur", as it would be later named, provided the bulk of the timber required by the Handle factory. The "Stratton Spur" is easy to find today, but believing that something was there at one time takes some stretch of the imagination. Traveling south from Winona along M-26 the Copper Range mainline crosses the highway and proceeds southwest. The mainline runs perfectly straight from this point to a point two miles further southwest. Just as the mainline turns south again was the location of the Junction to the spur from the Copper Range mainline. The Stratton Company extended the spur to a length of five miles, crossing M-26 due north of the Junction and proceeding north and west into Ontonagon County. The spur is in quotations because it was really a branchline in Copper Range terms. The Senter Branchline, for example, was only four miles long. At various times the spur was moved to reach new timberland, as this section of land was logged for 30-plus years. These routes can plainly be seen on any 7.5 minute Topographic map of the area. In order to take full advantage of the spur the Stratton Company purchased a Shay locomotive in 1913 which was used to haul Copper Range cars from the Junction to the logging camps. I have only seen pictures of this Shay on the spur, not on the main, so I believe that the cars were left at the Junction for the Copper Range trains to move. The company also used a small 0-4-0 tank engine, apply called the ""Rinky Dink", to shuttle cars around the plant in Atlantic Mine. The Copper Range used their 60,000-pound standard wood flat cars to carry the raw logs. I have not found any evidence of Stratton-owned cars but I wouldn't doubt they had some specialty cars. I am also not sure who supplied the caboose -- sounds like another research project. The logging camps were famous for their "sheeted beds and freshly laundered pillow cases," which really puts a dent in my idea of the typical logging camps of the times. I hope I don't find out they had salad night too. The camp also contained a bath house and dining hall. The bunkhouses were of log construction. Nearly 100 men resided in the camps at any one time. The community was self-sufficient having its own power plant providing the camps with electricity. Freighthouse/Shelter at Stratton The freighthouse and shelter featured in this article was built between 1913-1916, as it appears on the CRRR Interstate Commerce Commission's validation performed in 1916. It was most likely constructed in 1913 as the validation report states that 25% of the structures value had depreciated by 1916. The structure was located directly on the Copper Range mainline at Stratton. The signal flag tells us that this structure was also used as a passenger shelter. Even with the long winters many smaller passenger depots on the Copper Range were open air. With 100 loggers working the woods along the spur this building would have been very busy during its life.
The cedar wood for this structure was logged and milled by the Stratton Company and the Copper Range provided the labor to build it. The building contained two large freight doors, no windows and used 2x4 studs on 16" centers. The back end of the structure had another loading dock, I would assume for trucks. The structure was retired in 1940 although I am not sure if it was destroyed or moved. Freight house construction I have had a copy of the ICC validation for this structure for some time now, but these documents do not really allow you to model the structure in any detail as the ICC only outlines the major dimensions of a structure. I was lucky enough to come across a photo of the front side of this building last year and that photo showed enough detail to allow me to build this unique structure.
I wanted to simulate the tar paper / batten siding in a way that would look like real tarpaper. Just painting a wall black and adding stripwood would not cut it as I wanted to show pieces of the tar paper ripped off to reveal the bare wood planks below.. I started by using scribed basswood sheet stock, for the wall sections, which I left unpainted. The scribed sheet represents the 1" x 4" horizontal boards used to sheath the cedar frame. For the tarpaper I took a standard tissue and separated the layers so I only had one thin layer of tissue Once the four walls were cut out I applied a fine coat of Microscale Kristal Klear to the entire wall. I used Kristal Klear as it is not as strong as standard glue and it dries without leaving any residue. The tissue was laid on the Krystal Klear coated wall section and left to dry. After drying the tissue was trimmed to size and then I semi-dry brushed the tissue with NYC Dark Gray. After the paint had dried I added the 1x2 battens which hold the tarpaper in place. The boards were weathered with India ink and alcohol and left to dry. The tarpaper can now be ripped with an Exacto knife at random intervals and along the bottom of the structure. The scribed boards below are now revealed and are weathered by default from the Dark Gray and India ink that soaked through the tissue paper. The effect is very realistic, especially close-up. The door were made from the sections of scribed wall removed when I cut the door opening. They are just turned vertical. I added a 2" x 6" header over the door and for the footer at the bottom. 2"x 4" boards were used for the trimmers on the side. The doors were cut in half and slightly separated when glued to the back of the wall. Hinges and door handles were added with a fine line Speedball pen.
The Copper Range used 5, 6" x 6" cedar posts to support the 7 foot overhang for the shelter portion of the building. I built up a frame for the platform under the overhang which was used to line up the posts with the overhang. The posts are only 7 feet high but I guess high enough for loggers. The roof was finished last and was covered with The Rock Quarry's light green, pre-weathered, tarpaper. I wanted a thicker look for the roof covering and it is a nice product. Tarpaper rolls are normally 3 feet wide and the strips should be applied from the bottom up to the peak of the roof. If you can't find that material, masking tape, painted and weathered, works very well in simulating roofing paper. Again cut the masking tape into 3 foot strips and glue them to the roof. Do not rely on the tape to stick forever to the roof, apply rubber cement first to the roof before applying the tape. The Copper Range generally used 1" galvanized washers with the roofing nails to keep the paper in place. The two raised freight platforms were constructed next using 3, 6" x 6" x 6' beams crossed by 5, 2" x 6" x 12' joists. Covered by 24, 2" x 6" x 6' flooring planks. The platform is raised 3 feet above the base platform. The track-side platform is not shown on the elevation level views of the structure, therefore it you should include this added height in your calculations of the freight platforms. On my model it added 6" to the overall height to the bottom of the freight door. The track-side platform was built using 2" x 6" joists covered with 2" x 10" x 10' flooring planks. The station sign was added next. All of the Copper Range stations used the same size signs which were 7' x 14", trimmed in white with a black background and white lettering. Many stations had a very strange period after the station name, I know for a fact the shortest sentence is "I am." and not Stratton, Freda, etc... The entire structure was weathered with an alcohol and India ink solution to age the raw boards. Turning a long lost photo and long since filed government document into something that hasn't been seen since 1940 is what modeling a proto-type is all about. I will never look at that thick grove of trees that is today the Stratton Spur in the same way again. I will always see this freight house standing right on the mainline. Better yet I can see the Stratton Spur every time I walk downstairs and share it with those who like to ride the Copper Range back into history. Freda and Mason shelter Since we are on the subject of passenger shelters I though I would add two additional shelters used by the Copper Range as flag stations. Both of these depots were built for stamp mill towns with small populations. It makes a perfect project for trying your hand at board by board construction for the first time.
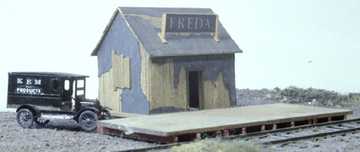
The two shelters were structurally the same, only the siding material was different, therefore the same plan can be used to build either station. Mason was the home of the Quincy Mining Company's stamp mill on Torch Lake. The Mason shelter was built in 1905 and retired in 1931 and used shiplap siding like the plan. Freda was the home of the Champion Copper Company's stamp mill on Lake Superior. The Freda shelter was built in 1901 and used vertical siding with a tar paper covering. The Freda depot was more unusual so I built that proto-type. What makes this structure unusual is the fact that the Copper Range used the 1" washers/nails I described on the Stratton Shelter, in place of the batten boards. You can see them running down the side of the structure. This shelter in Freda should not be confused with the Passenger shelter at Freda Park. The Freda Park shelter was larger, being 10' x 416', to handle the many passenger cars on the Extra to the Park. The Freda shelter for the town is the one pictured here and only had a platform length of 18 feet. The Mason shelter had a 60 foot platform. Both of these platforms were built on blocks spaced 6 feet apart, on 2x8" joists.
This shelter is not much larger than a typical backyard garden shed and because of the small size the Copper Range used 2 x 4's on two-foot centers. They even went so far as to use 2 x 4's for rafter's, again on two-foot centers. I opted to build this shelter board by board since the two-foot centers made it easy to measure in HO scale. I have a process I use to build board by board structures that I developed by building a real structure, except I use glue instead of nails. I tack the top plate to a piece of glass to hold it in place, which has been marked at 2 foot intervals on one side. The top plate is made up of two 2x4's glued together. Once the top plate is securely fixed to the glass it is easy to glue the studs in place to complete each wall section. Triple studs are used at the end of the side wall sections where they will meet the front and back walls. This creates a solid surface to connect the walls together. A single sole plate at the bottom completes the framed wall. Once the entire wall section has dried I slide a razor blade under the top plate and remove the framed wall section from the glass. The glass provides a flat surface to insure a flat wall. The front and back wall sections should be made 15'4" in width to compensate for the 8" of side walls. The Freda shelter had vertical board siding which was just planked side to side, 1x6's were used. I used 1x10's just so I didn't have to cut so many. It is a requirement to have an adjustable jig for cutting studs, siding, sole and top plates so everything goes together squarely. The roof was planked with 1x10's. I built this model some time ago and used standard tissue paper for the tar paper. I cut out sections of tar paper to match the proto-type as closely as possible. I guess the Copper Range found out that washers don't work as well as battens.
I did not attach a floor and foundation to this model directly. With board by board construction I build the foundation and add a 2x4 sill plate to the top of the foundation. The structure's sole plates rest on the sill plates to finish the model. A final trim piece is added to the sole plate which overhangs the sill therefore creating a clean transition between the structure and the foundation. The room detail and walls can be viewed by simply removing the structure from its foundation. These shelters had no interior walls so it is a perfect model to display your board by board construction techniques and remain prototypical. ICC documents and photos were used to develop this model. It is hard to imagine six men standing on this platform waiting to get their picture taken. I am glad they did. Then again what else would you expect to find at the end of a branchline, on a railroad that moved copper, not passengers.
|
|
|
||
|
||
|
||
| . | ||